Sick of mopping up dirty, spilled water after every water change?
Exhausted from spending 35-40 minutes changing out a measly 20 gallons of water from your 75 gallon tank?
(You get my drift...)
If you own a fish tank bigger than 20 gallons, there is no reason why you should not be spending a good $50 CAD and buying yourself an Aqueon Aquarium Water Changer. And if you own a tank larger than 45 gallons, and you haven't already gotten this device, you must be crazy.
Here's the Amazon.ca link:
http://www.amazon.ca/Aqueon-6089-Aquarium-Changer-25-Foot/dp/B000YAJKL6/ref=sr_1_1?s=pet-supplies&ie=UTF8&qid=1423693614&sr=1-1&keywords=aqueon+water+changer

I was skeptical at first too. I'd heard about these hose-like aquarium water changers for a long time, but it seemed expensive and not that useful in my mind. It was finally my fiance who convinced me to buy this. (Thank you!) I was grudgy about spending even more money on yet another water-changing device. After all, I'd already purchased 3 different gravel vacuums and a bunch of buckets.
But after a gruelling day of doing a 60% water change (I was tearing down the cichlid setup and doing a freshwater aquascape) on my 50 gallon and practically flooding my living room floor, I decided to go on Amazon and buy the damned thing.
It arrived in about a week (Thanks Amazon!) and the shipping was free (Thanks Amazon!)
My immediate grievance: the packaging in the ad looked like a simple plastic bag. What I actually received was THE TOUGHEST hard plastic blister packaging I have ever encountered in my life. It was as if they were trying their very best to prevent customers from EVER opening the packaging.
 |
| Toughest packaging I have ever encountered in my life |
It literally took me 1.5 hours just to open the f***ing thing. I had to use: heavy duty scissors, a can opener, and a butcher knife as well as my bare hands. The cut open shards of plastic would scratch my arms...
When I finally opened it, I took everything out. Very sturdy tubing. Good adaptors. Everything looked well made and good quality. I removed the faucet adaptor and tried to hook it up to my kitchen sink faucet (the only one that's closest to my fish tanks). No luck for 35 minutes.
I watched a Youtube video about it. Still no luck. Frustrated and nearly in tears, I tucked away the stupid piece of $hit and decided I was going to return it. Never again, I vowed. Never again.
(To be fair, the packaging comes with 3 or 4 different sized adaptors so it fits most sinks. Mine was just...unique...I suspect)
But I got carried away and never got around returning the thing and it just sat in my closet gathering dust for almost 3 weeks. By then I figured, I could try and buy another adaptor and if that failed, I could resell the water changer.
So I visited my local home hardware store (Canadian Tire as it were) and lo and behold, they carried a "Faucet to Hose Standard Adaptor for all N.American faucets". I bought it for $8. It was stainless steel.
I tried for 15 minutes to put this new adaptor on my faucet until I realized there was an aerator covering the top. That had to come off. (If you don't know what an aerator is, it's a covering for the faucet that looks like a small screen) Once that came off, I finally figured out that I had to match the threads and screw in the adaptor COUNTER CLOCKWISE. That's the key. COUNTER CLOCKWISE or it won't go in people!
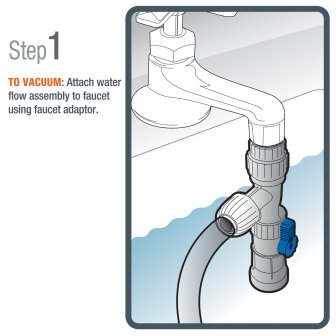
After I fit in the stainless steel adaptor, I hooked up the Aqueon plastic adaptor to it and the water flow assembly (the long bit with an open end and the blue switch) followed. I pushed one end of the tubing into the water flow assembly and twisted it tight. (See photo 1) Then I attached the other end of the tube to the gravel vacuum end (near the other blue switch). The plastic was very rigid so I had to blast it under hot water to soften it up a bit first.
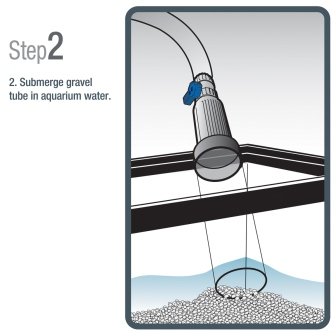
Next, I submerged the gravel vacuum end into my aquarium.
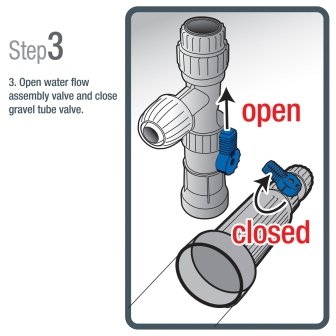
Step 3 here is important. Flip the blue switch attached to the faucet UP (this opens up the water flow assembly so tap water and aquarium water can come out of the base) and flip the blue switch on the gravel vacuum bit to the RIGHT (optional at this point).
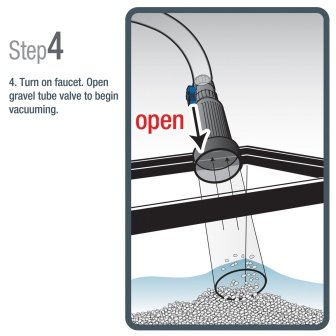
Step 4. Turn on the faucet. Water should be gushing out of the bottom of the water flow assembly. Next, with the other end of the water changer fully submerged inside the aquarium, flip the blue switch on the side UP (if you closed it earlier). It should be parallel to the suction tube. You should see water slowly rising and going into the tube, into the hose and out through the sink.
Note: if it's a small water change (5-10%) keep the faucet on. However, if you want to save water, especially if it's a bigger water change (10% or more), once the suction is fully started (you see dirty aquarium water exiting through the faucet adaptor) you can turn off the faucet. Water will continue to leave your aquarium due to sheer physics.
If you don't understand how to use regular gravel vacuums, see my previous post about How to Use a Gravel Vacuum.
Gently, just barely touching the gravel or substrate of your tank, suck up bits of rotting plants, leftover food and debris. DO NOT shove it deep into the substrate as this will release harmful nasties that were never meant to resurface.
Remember to cover areas under rocks and driftwood (where debris tends to build up unseen)
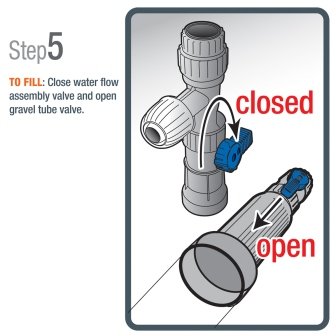
Step 5. Once you have finished vacuuming and changed enough water, leave the suction end inside the tank while you go to the sink and flip the blue switch on the water flow assembly to the RIGHT. This closes the bottom of the assembly.
NOTE: If you turned off the faucet to save water earlier, you must turn the water back on, check the temperature of the tap water FIRST before you flip the switch on the water flow assembly. This is to make sure that the tap water you refill the tank with is not too hot or cold.
NOTE: If you didn't turn off the faucet, you still need to check the tap water temperature before flipping the switch.
Once you flip the blue switch on the water flow assembly attached to the sink, tap water will flow through the plastic tubing, OUT through the gravel vacuum and into your tank. Make sure at this point that the gravel vacuum end's blue switch is OPEN (UP)
As you refill your aquarium, measure out enough water conditioner for the amount you changed out. (I.e. if you changed out 20 gallons of water, measure out enough to condition 20 gallons of tap water) Some advise you add enough conditioner to condition THE WHOLE TANK VOLUME but I find that wasteful and unnecessary. Take the amount of conditioner you measured out and pour a little in every corner of the tank to spread it out.
When you are done filling up the tank, go to the sink and turn the blue switch attached to the water assembly (this starts up the sucking again). Remove the gravel vacuum portion of of your tank and take it, along with the tubing, back to the sink. Hold up the gravel vacuum until all the leftover water is sucked out of the tubing. Detach the water flow assembly from the faucet.
All done!
Sounds like a nightmarish, complicated process but it's actually SUPER EASY and once you do it once, you'll never have to think twice about it again. Changing 20-25% water from my 50 gallon tank used to take 40-45 min and it was super messy. Now it takes about 10 minutes and I don't even need to do much. No more back pain. No more spills.
Partial water changes are critical to maintaining a happy, healthy aquarium!
If you have questions, comments, let me know!
Thanks for reading
Chesmok
PS: If you just want to do a simple water change and NOT vacuum the substrate, just tuck the gravel vacuum under the hood/cover/light of your aquarium and it will just change the water. Careful, sometimes small fish get sucked up by this powerful vacuum if you're not careful!
No comments:
Post a Comment